Getting started
This guide walks you through setting up the example content destination server, connecting it to a body worn system (BWS), and receiving your first recording.
Watch Installation tutorial: Axis Body Worn for an introduction to the system.
Prerequisites
- Physical access to an Axis BWS: a system controller (AXIS W800 System Controller), at least one body worn camera, and a docking station.
- A computer on the same network as the system controller.
- Familiarity with the body worn data flow (adding a user, assigning a camera, transferring recordings).
For more context on the topic, see Axis body worn integration.
Download and explore the example code
You can find the documentation and example code for the body worn content destination API in the body-worn-content-destination-api repository.
- Download the sample code (written in Go) and examine how the containers are structured.
- To see the network protocol details, capture a network trace to observe the flow.
- The Go code works on both Windows and Linux. The example below focuses on Windows.
Install the example server
-
Build the example code.
-
Open Command Prompt as administrator (right-click → Run as administrator).
-
Navigate to the directory containing
AxisBodyWornSwiftServiceExample.exeand run:Install Axis body worn Swift service exampleAxisBodyWornSwiftServiceExample.exe install -
Follow the install prompts:
- Create a username and password (the password is not displayed as you type).
- Enter storage location — where recordings from the BWS are stored.
- Choose the port (leave empty for default 8080).
- Choose IP address, for example:
169.254.220.88. - Choose HTTPS:
yfor production,nfor easier debugging during development. - Open the chosen port in Windows Firewall if needed.
The installation creates settings.cfg in the same directory as the executable. The server reads this file on startup.
Run the example server
Run as a Windows service:
AxisBodyWornSwiftServiceExample.exe start
Stop the service:
AxisBodyWornSwiftServiceExample.exe stop
To run interactively (with logs in the terminal), stop the service first, then double-click the .exe file.
To uninstall:
AxisBodyWornSwiftServiceExample.exe uninstall
When run as a service, configure it to start automatically on boot. Service logs appear in the Windows Event Viewer under Windows Logs → Applications with the source name AxisBodyWornSwiftServiceExample.
Get a connection file
The system controller needs a JSON connection file, supplied by your application. In the example server, it's stored in the configured storage location as config.json.
The data flow is push-based: the system controller pushes recordings to your content destination. Your application acts as a server listening for incoming data. When transfer completes, all video and metadata is in your content destination and deleted from the system controller.
All system configuration happens in the AXIS Body Worn Manager, not in the content destination.
Transfer your first recording
- Record a few clips with a body worn camera.
- Dock the camera so recordings offload to your server.
- Optionally, use Wireshark to capture network traffic and observe the API calls during transfer.
View location data
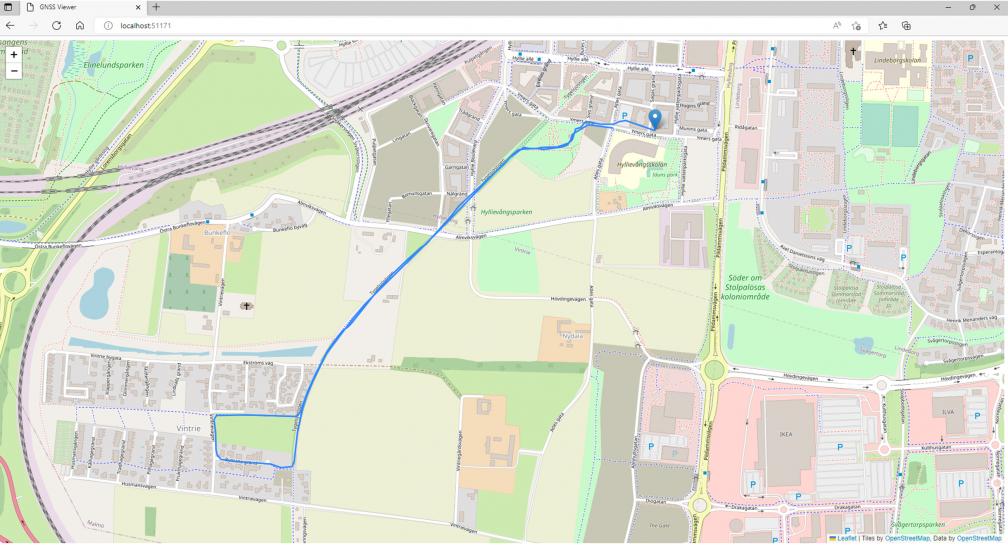
The example server includes GNSSViewerExample, which displays GNSS (GPS) trails using Leaflet and OpenStreetMap.
- Run the example server and transfer recordings with GNSS trail data.
- Locate the
*_gpstrail.jsonfile in the recording directory. - Run:
GNSSViewerExample_windows_amd64.exe <path-to-gpstrail.json>
The tool starts a local web server and displays the trail in a browser.
Enable signed video
With AXIS OS 11.0, Axis BWS support signed video (except AXIS W100). To use signed video, enable the StoreSignedVideo capability in your content destination. After transferring a recording, keep the SEI frames to verify signing information.
Tips for implementation
- Use HTTP only in an isolated local development environment. Use HTTPS for shared development, test, staging, and production environments.
- Video files come in MP4 or MKV format with AAC audio (48 kHz). Use the AXIS Media Control SDK to parse MKV data.
- Plan how to store metadata (XML, JSON, or database) alongside video. Show relevant metadata to operators.
- Return the success response required by the body worn content destination API only after confirming that the file transfer is complete and the file is not corrupt.
- If your system goes offline, the system controller retries regularly and keeps recordings until transferred.
- Choose the programming language that best suits your system. Use the sample code as a reference and adapt it to your chosen language.
Next steps
- Axis body worn solution — understand the full system architecture.
- Set up a content destination connection — build your own connection file.
- Retrieve recordings — download and process recordings programmatically.
- Integration checklist — verify your integration before release.